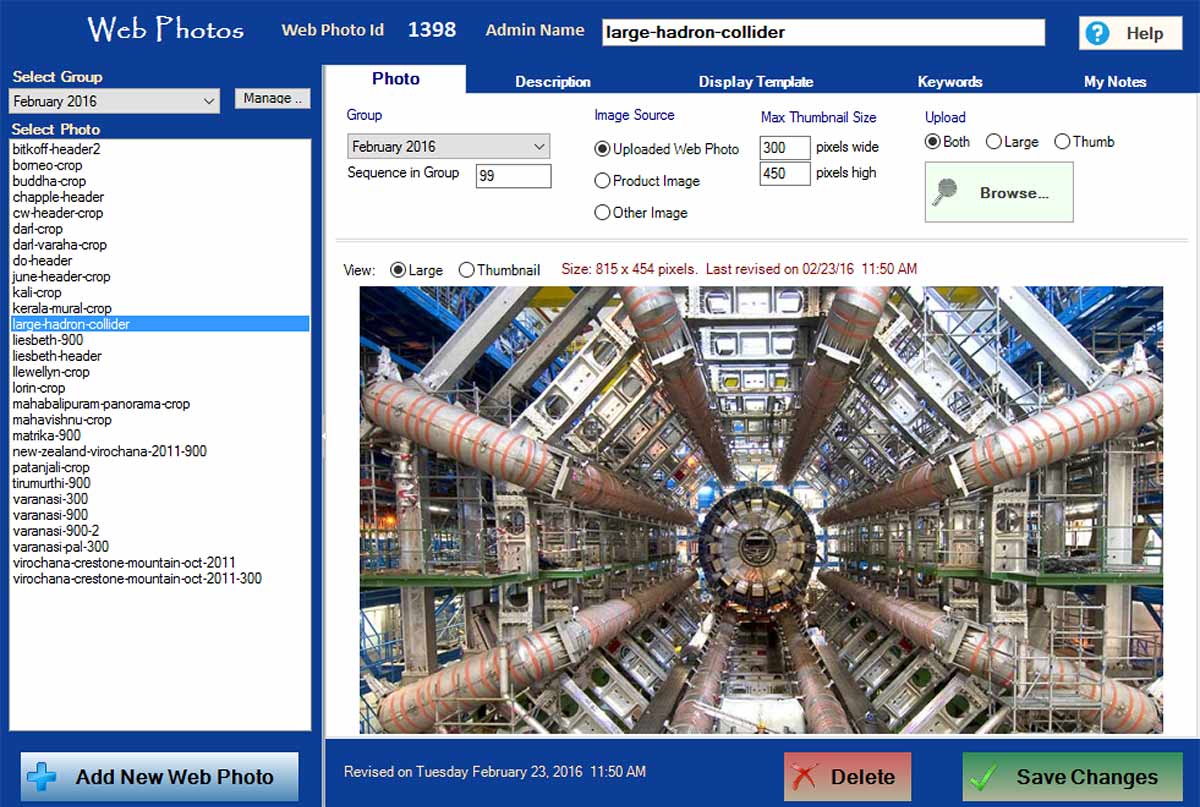
Web Photos are used for content management of images for display on your website. Products, catalogs, etc., have their own set of images; so web photos are used in other ways. For example, on the images on you home page, in banners, listing images for articles, photo galleries, etc.
When used for articles, a good idea is to make the listing image for the article content managed, and to reference the images within the article content itself referencing the image file uploaded to your website. This reduces the number of images stored in the database and its size.
There are a number of tabs in web photos management, and for most users, everything they need is on the first tab. The additional tabs are useful for advanced options when creating photo galleries and for controlling the html attributes of how a web photo is used when displayed via a content rotator.
Be sure to set your default thumbnail size in global setup, although you can override this. Generally, upload the large image at the size you need it, and of course optimize the image for display on the web by compressing it first.

Adding a New Web Photo
1) Click on Add New Web Photo button in lower left
2) Click on Browse button
3) Click on Save Changes in lower right.
Changing an Existing Web Photo
1) Select the web photo
2) Click on Browse button to replace it.
3) Click on Save Changes.
Groups
It is much easier to organize your web photos in groups, particularly when there are lots of them. In the various places in the admin where you can set a web-photo, you may filter the drop down list by a group.
When you add a new web photo, by default it will be set to whatever group is currently selected on the left side. You can change the group a web photo is in at any time.
Groups can also be used to filter which images are shown for a particular photo gallery.
Sizes
Web photos are stored in the database in three different sizes: Icon / Thumbnail / Large
This is different than for product and catalog images which are stored in five sizes. Set the default icon and thumbnail sizes in global setup à image size defaults. Typically, when you add a new web photo, you will upload a single image and the thumbnail and icon images are automatically generated. However, there is an option to upload a different image for the thumbnail (and the icon created from it), after you upload the main image.
For Developers:
In various places within the API for classes that typically use web photos, a method will be available to return the URL for the web photo, and a method to return a full html image tag with arguments to specify CSS class names and styling options. An example of this is for articles.
In addition, you can set the ‘src’ attribute in an html image tag in the following format to access your web photo.
http://www.mywebsite.com/image/photo/web-photo-id/size
web-photo-id = is the ID of the web photo
size = icon/thumb/large
so an example would be:
http://www.mywebsite.com/image/photo/108/thumb
